And so, to the Studio.
I use a “stamp and pour” technique to create these stunning cast glass art pieces.
I stamp a hard mold into a bed of damp sand, remove it, then pour liquid molten glass into the hole in the sand.
But It Is Not Sand Really…
The sand is, well, not sand at all. Metalworkers have called it “green sand” for hundreds of years because it’s ground-up peridot, a semi-precious stone with a green hue. I mix it with a smidgen of clay dust, water it gently, and push through a fine sieve until it is a fluffy mass, perfect to have a shape pressed into it. This “sand” will hold quite fine detail and adds its own wonderful surface texture to any metal (or glass) cast into it.
Now We Get Down and Dirty
Before the horse shape is pressed into the sand, it’s coated with a fine layer of graphite dust, so the sand does not stick to it. Yes, graphite like in your pencil, and several hundreds of times messier! The stuff gets everywhere. Everyone in the studio wears respirator masks for this part of the process and we all get a wonderful outline of the mask blackened into our faces…
Not to worry, though – once we get to the sweat of casting, it’s supposed to roll right off, right? Never happens though…
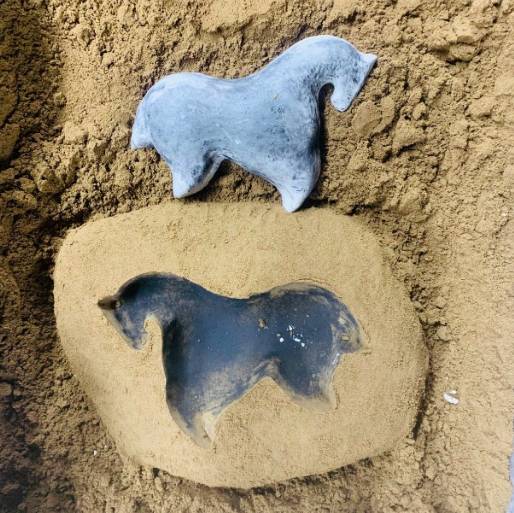
In the Sand
I take our graphite-begrimed hard plaster Horse mold and carefully and firmly press it into the sand. I pound the sand all around the mold until it is nice and hard, and I can carefully remove the plaster shape. There is now a “hole” in the sand, faithfully duplicating the original Horse shape.
This is the last chance for me to work at the sand mold. I often take hours, adding a little sand there, taking away a little here, until I am completely happy that I have the perfect mold for the piece I have envisioned.
On some pieces I will add bits of copper I have cut and hammered into shapes, but this Horse has no need of these.
Really Dirty!
Just to make sure we all have not missed any chance to get dirtier, I now blow a thin layer of fine black acetylene soot over the mold. The soot prevents (mostly) the sand from sticking to the glass. This gives the sand the characteristic black surface you can see in the pictures.
PIC OF FRIT ON SAND
Yay, Color!
Once this is done, I sprinkle a thin layer of powdered colored glass called frit into the “hole”. This frit will color the front surface of the glass. For this piece I chose only one color, but for some pieces it can be as many as 40 different shades.
And although I use a clear glass for casting the Horse sculpture, sometimes I will use a colored glass for the casting glass itself, allowing endless combinations of frontal and body colors.
With the working of the sand, copper additions, colored glass and colored frit, no two pieces can ever be quite the same… Not even if I tried!
Once the pressing is done and the sand all neatened up, it’s time for HOT GLASS!
Recent Comments